Thursday, December 30, 2010

Stick snowman ornament


Here is the picture of my stick snowman. I do this project with second grade. I takes 3 classes. The first class we assemble the sticks. There are two short sticks on the back to brace the project, although it seems to hold together without them. If there is time at the end of the first class, we make the star. Second class paint, third class decorate. The smile is made from pre-cut rug yarn, but you could use yarn that you cut or paper (hole punched "coal" would be cute). This project is a bit difficult (assembling the sticks) but I have had many positive comments from my parents.

Monday, December 20, 2010

Winter Cardinal


I found this from another art blog:


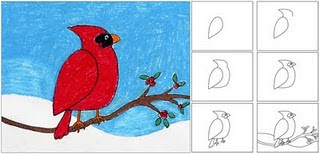
1.Make cardboard wing templates for students to trace to keep the scale of the bird from starting out too small. The rest of the drawing was done with step-by-step instructions on the board. Describe the wing as needing to be tilted a bit, a “shark fin” was added on top, and a belly below. The black face looks a bit like half of a butterfly, and the beak extends directly to the right of it. A tail is added below, along with feet. The branch is behind the feet so it’s lines jump over the feet and tail.

2. After the drawing is done, it needs to be traced with a thin black marker.

3. Lastly, all except the snow is colored in with oil pastels.

Wednesday, December 15, 2010

Russian Palaces


This is a lesson I do with Kindergarten. You can change it up and make it more complicated, or simplify it. We looked at pictures of the Kremlin and St. Basil's Cathedral in Russia and discussed the similarities and differences between those buildings and buildings they have seen. Then we talked about different lines and shapes they could use to make patterns on their buildings (like the towers on St. Basil's). This year, on the first day I had the kids paint the sky (I splattered on the snow later), and work on creating the patterns on their 4 towers and door (in other years I've done it more simply without the frame and painting the background). The second day we cut out the Hershey kiss shapes for the roof tops and added sparkles and a frame.

Monday, December 13, 2010

"Buffalo Skins"


I read Legend of the Indian Paintbrush by Tomie DePaolo to my second grade students when they are learning about the Plains Indians.
They use a crayon resist technique on brown kraft paper to paint their "animal skin".

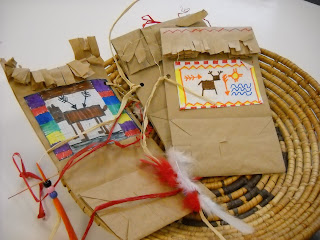
Medicine Bags


Second grade students make these Sioux "Medicine Bags" when they are studying American Indians. I do a lesson from each of the different groups of American Indians. I tell my students that the Plains Indians would use animal skins and rawhide with bead decorations on a bag. We use lunch bags, graph paper, raffia, feathers, and pony beads.

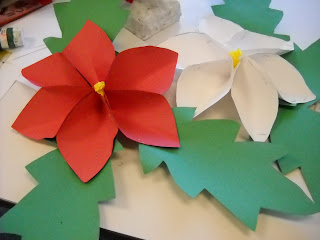
3-D Paper Poinsettias


Students trace and cut out three petals and three leaves. Each table of students gets one stapler to share and they help each other fold and staple petals together. We wad up a piece of yellow tissue paper for the center of the flower.
These look great on a bulletin board in December and parents always love them when students take them home.

Friday, December 10, 2010

Monthly Mentor Blog (NAEA)

Here are some very interesting blogs about different areas of art education from assessment to special needs students. The latest one is about an art teacher's community art program where she partnered with Fred Mutebi to create a mural exchange between Texas students and students in Uganda: Monthly Mentor.

Positive/Negative cutouts

This is a super lesson to do around the holidays. Students will first learn the terms ''related shapes '' and ''radial shapes''. On a 9'' black paper square, class will draw their design with pencil. Place design on a newspaper and cut using exacto knives. (...threaten first, and remove knife if anyone ''plays'' with it ).When design is cut out, use scissors to cut pieces of tissue to glue on the back...remind them that each shape has a different color. They may also use the knives to do the smaller pieces of tissue to fit. Display in any window using small pieces of masking tape.

Hands -Positive/Negative

This is a simple positive/negative lesson I do with younger children. Start with a 12'' square paper and 2 colors of 6'' paper, 3 each. Students will draw their hand onto one-do not touch the sides or top, and cut out. Trace the one hand onto the other 5. Cut all out, saving both the outside part and the inside hand.( positive and negative ) Arrange the pieces in a balanced design on the 12''square paper, and then let them glue it. Simple, easy, and may use any shape that can be easily reproduced.

Tuesday, December 7, 2010

Nutcracker


I found this idea on another art blog. I really liked it, so I changed it up a little and tried it out with second grade. It has been very successful. They loved doing it and all of them came out great, as you can see from the  photos of a few of them.  We drew the nutcraker step by step using basic shapes, outlined it with sharpie and then painted with cake tempera the first week. The second week we went over anything we needed to touch up with sharpie, cut them out, glued them on the black paper and added glitter. I love the project, will definitely do it again.

Mosaic Penguin


What you'll need:
1 sheet light blue construction paper
Construction paper: black, white, orange, and red
Pen
Glue stick
Black marker
Pattern: http://crafts.kaboose.com/mosaic_penguin_template.pdf
How to make it:
Place pattern on top of the light blue construction paper and trace it with a pen. This will create an indent in the blue paper.Add a simple line behind the penguin's body, just a few inches above the penguin's foot. This is the land.
Tear white and black construction paper into strips, and then tear the strips into squares.
Remove pattern. Apply glue with glue stick to small areas of the blue paper, using the indentations as a guide. Start with the "land" area first, pressing white paper scraps in place.
Still working in small areas (so that your glue doesn't dry before you get to it) press on all the black paper areas. Finish with the white area in the center of the penguin.
Tear or cut out a triangle beak from the orange paper and glue on to the face. Use black marker to add two eyes and eyebrows. Tear or cut out a bow tie from red paper and glue in place under the beak.

Monday, December 6, 2010

Majolica pottery


Description
Majolica pottery demonstrates that a beautiful idea can travel
the globe! During China’s Ming Dynasty (1368–1644), potters
used cobalt, an Arabian mineral, to create a dark blue glaze to
contrast with China’s white porcelain clays.
Later, Islamic potters mimicked the look with their reddish, iron rich
clays by painting bright oxides and stains on a tin-glazed,
opaque white background. Their wares became as popular as
Chinese Ming pottery and often were shipped from Spain to Italy
via the port of Majorca, an island off Spain’s eastern coast.
Pottery painted with colors over a white base became known
as “majolica” and was widely produced in Italy during the
Renaissance. Florentines Lucca and Andrea de la Robbia were
the best-known majolica clay artists, creating large religious relief
sculptures glazed with bright colors on a gloss-white base.

Preparation: Gather photographs of Ming Dynasty
pottery as well as Islamic and Italian pottery in the majolica
style. Display in the classroom resources that explain the style’s
movement across cultures.
With the students:
1 Start with a baseball-sized lump of clay (about 1 pound)
for a small goblet and an orange-sized lump (about
1 ½ pounds) for a larger one.
2 Make a pinch pot:
• Roll less than half of your clay between your palms or
against the tabletop into a perfectly round, egg-sized
ball.
• Push your thumb about halfway into the center of the
ball and turn it, pinching the clay gently between your
thumb and fingers. Focus on the thick parts, pulling
upward and inward to create uniform walls and a tall
tulip shape (not a cereal bowl). Keep the rim thick
enough to prevent cracks.
• Tap the bottom of the pot gently on a table to flatten
it slightly.
• Invert the pot on a small board or piece of cardboard.
3 Roll the remaining clay on the tabletop into several ropes
the diameter of your little finger. Set aside the best rope for
the rim, covering it with plastic.
4 Score and slip the bottom of the pinch pot. Then score and
slip the ropes and coil them atop it, pressing them gently
together. Make the coils close and tight near the pinch
pot, where fingers will grip the goblet, and coil the ropes
upward to the goblet’s desired height.
5 Turn goblet right side up. Gently tap the base coil flat so
the goblet is stable and the rim is parallel to the tabletop.
6 Score and slip the pinch pot rim and place the reserved rope
atop it. With a wooden tool or your finger, gently smooth
the joint, affixing the rope firmly and tidily to the rim.
7 Texture, stamp and sprig goblet as desired. Support goblet
gently with your fingers as you texture or stamp it; score
and slip any sprigs and clay pieces you add to the goblet.
8 Turn goblet upside down to dry. Check that the base is
parallel to the tabletop.
If you choose:
Decorate the goblet with the majolica technique:
• Brush two to three coats of lead-free
White (LG-11) using a wide brush. Glaze evenly onto
cone 04 bisque-fired goblets. Glaze may be applied onto
bone-dry greenware (without bisque-firing first) but
beware as the pieces would be very fragile.
• Paint images and designs by brushing one to three coats
of Gloss Decorating Colors over the dry Opaque
White Glaze to emulate true majolica. Fewer coats give a
translucent, watercolor effect.
• When dry, fire to cone 05. Do so slowly if you have
applied glaze to bone-dry greenware.

CORNUCOPIA


CORNUCOPIA


Materials:
1. tissue paper (brown, purple, blue, yellow,
red, orange and green)
2. (1) 9" x 12" piece of newsprint
3. (l)9"x 12" white construction paper
4. liquid starch
5. paint brush
6. black crayon


  • Steps:
    1. Cut a cornucopia out of brown tissue paper. Cut various fruit shapes from the other
    colors of tissue paper.
    2. Have children arrange their design first on newsprint.
    3. Paint the white construction paper with liquid starch. Move the arrangement from
    the newsprint to the white paper, one piece at a time. Go over the top of each piece
    lightly with the liquid starch. Be careful not to go over the edges so the colors won't
    run.
    4. Outline the design with crayon after it is dry. The colors of the tissue will have run a
    bit and this makes it more interesting. Outline the original fruit design.

Tuesday, November 30, 2010

Paper plate turkey-3rd grade


The students love this project. You will need 2 paper plates per student. Before the class, use one paper plate per child to create a cone (staple it). The children will cut across the bottom of the cone. That cut off portion becomes the turkey's wing, the upper portion is the body. Fold down the point of the cone to create the beak and face. The second plate is divided, not quite in half, to create 2 sections of the turkey's tail (you want one section larger than the other). The two sections of tail are divided like a pie, each section painted a different color. We paint the body and wing brown, and the beak yellow, add google eyes (don't they make every elementary project better) and feet. I give out a written instruction sheet for this project that also includes pictures. My goal with the written instructions was to support SOL testing (helping the children learn to follow instructions) as well as reduced stress for me! Those who have trouble reading the instructions use reading buddies, which has not caused any conflict for me. This has been a very successful project!

Monday, November 22, 2010

More Op Art

This Op Art Lesson is very simple, but you may may make it as difficult as you wish. This is just 3 pieces of construction paper that have a simple line pattern on it. They are attatched in the middle with a brad. The pieces of paper may then be moved in any manner to change the design look....try odd shaped paper with any combination of designs/patterns, and more than one brad.

Sunday, November 21, 2010

Canopic Jars

Fifth graders are making Canopic Jars using Pringles cans;
Day 1 - We started by looking at Canopic Jars from Ancient Egypt and learned a bit of background about the 4 sons of Horus and the purpose of the jars. After the introduction, the students practiced making a head with modeling clay. They were given the choice of making one of the 4 sons of Horus or any head they chose.

Day 2 - We used Sculptamold - my first experience - to make the heads on the lids of the Pringles cans. I wish we'd used Model Magic instead. The Sculptamold was gloppy and bothered some of my students with disabilities... not to mention that it was very soft and not at all like the modeling clay they'd practiced with.

Day 3 - We papier-mached the Pringles cans and finished them with a couple of pieces of tissue paper.

Day 4 - We began by talking about hieroglyphics and Egyptian patterns. I passed out lots of examples from a Dover book on Egyptian designs, and gave each student a sheet on hieroglyphics. We then decorated our cylinders/cans with gold Sharpie paint markers, glitter glue, and regular Sharpies. We also used Tacky Glue to affix the dried Sculptamold heads on to the Pringles lids and set them aside in a separate box.

Day 5 we will paint our heads with acrylic or metallic tempera paint. I can't wait to see how they will turn out!

Friday, November 19, 2010

Wishing tree


This lesson was an idea I modified from the Arts & Activities magazine that our school receives. I did it with first graders, but older kids would also enjoy it. Week one, we drew a tree on a 6''x8'' paper-the same size as the styrofoam. I had the class draw the trunk half the way up and then 'branch out' the limbs. I told them to place 17 leaves on their tree..it helps to give them an exact number. We then taped it to the styrofoam and retraced, pressing firmly. Tell class to place their names on the BACK of the styrofoam.The next week we took pastels and  colored a 9''x12'' paper, then smoothed it with kleenex. The class then printed them. I did put the boarder on before we printed--it just seems to make everyones look a little more ''finished''.  Everyone had a nice print.

Buffalo Paintings


I got this lesson from another art teacher's website, but I added the Native American symbol frame to it. I tried to squeeze it all into 2 days, so I did the background and buffalo on the first day, and then cut the buffalo out and glued it all together and added the frame the second day. I also read the book "Buffalo Woman" by Paul Goble on the second day (it's a Native American legend about how the Buffalo Nation and Native Americans became "related").

Gargoyles!


I stole this clay gargoyle lesson from Cassie several years ago. The kids LOVE this lesson, the younger ones can't wait to be in 5th grade so they can make their gargoyle. This year I changed it up a little bit. I had an overwhelming number of coffee cans and plastic containers, so I decided that the kids would also make a building for their gargoyle to live on. We looked at and discussed gothic architecture, and then created our buildings on gray paper with sharpies and white colored pencils. They turned out really nice!

Thursday, November 18, 2010

Owl Drawings

Vocabulary:

Line, pattern, convex, concave, nocturnal


Materials

Owl Moon

12x18 white drawing paper

black sharpies

owl images and books

colored pencil/watercolor


Procedure

The students will draw a V on the page upper center, add circles on each side of V, add smaller circles inside those and color in for eyes, close v off with wavy half circle at top, add V to bottom of eyes to make beak, add zigzag lines around eyes and over top but not to touch the beak, add 2nd and 3rd row of zigzag feathers, draw to curved lines(concave and convex) from near beak down to make wings not to touch at lower end of page, add outer layer to create wings on both of those lines, add feet at junction of wings near bottom of page, fill in belly with little v's for feathers or other feather like shapes, add branch and tree to complete, have students add any other details they want. The students can then add watercolor, or crayon

Art Websites

Artsonia is a great site for lesson plans. Teachers share lessons for elementary through high. There are also articles on various art topics and contests. If you are a memeber of the NAEA you can register your school for free. Also, you can have an online gallery of student work. http://www.artsonia.com/

Tuesday, November 16, 2010

Food Color Wheel

Food Color Wheels

Materials:


Color Wheel Handouts
Pencil
9x9 white paper
circle templates/paper plates
red, yellow, blue tempera paint (for mixing)
brushes
water
scissors
glue
card stock paper/posterboard/black constructions paper

Steps:

1. Begin by asking children to draw a banana and an apple, which they will paint yellow and red. (For younger children: pre-draw fruit shapes that they may paint in)

2. Then they may paint a number of blue dots, which will represent blueberries.

3. Ask children to draw a lime, then ask what color it should be. Instruct them in mixing green from yellow and blue, so they may paint the lime green.

4. Do the same for an orange (yellow+red), and a plum or cluster of grapes (blue+red).

5. Once painted fruits have dried, cut them out.

6. Cut a circle out of card stock/black paper.

7. Beginning with primary colors, glue "fruit" around the plate according to their colour to create a color wheel

SOLs 3.4, 3.6, 3.5, 3.4

Bad Case of the Stripes


To begin this lesson I read the book A Bad Case of Stripes by David Shannon. We then drew self-portraits with sharpies, and painted stripes. The next week we made a pattern for our frame and cut the person out and glued them on. They look GREAT! It's a really good book for the beginning of the school year.

Thursday, November 11, 2010

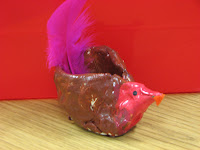
Turkey Pinch Pot


Turkey Pinch Pot

I introduced my kindergarten classes to pinch pots. After forming the pinch pot, they pinched a bit of the top together to make the turkey's head. Then they used their fingers to pinch up the back of the pot to make his tail. After they were fired, they used Jazz Gloss paint to paint the head red and body brown. After they were dry, I drew on eyes for them with a black Sharpie and hot glued a feather and beak to their turkey. The kids loved them!

Thursday, November 4, 2010

Shape dragon for second graders


My shape dragon lesson was taught to second grade students. There were 5 small circles used (the size of the head), with one left whole, two cut in half, and two cut into quarters. The students enjoyed the project and learned something about math, too!

Monday, November 1, 2010

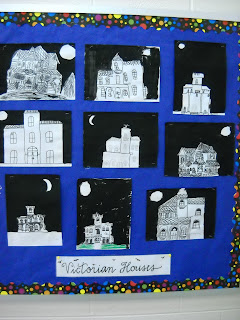
Victorian Houses


I do this lesson with fifth grade students and have had great success and interest on their part. I introduce Victorian Houses as a style of architecture originally from the 1800's. I have collected many photographs of Victorian houses from all over the country which I share with my students. I've also used a print of Edward Hopper's House by the Railroad . We pay special attention to details like gingerbread trim, cat walks, dormer windows, cupolas, turrets, finials, iron gates, etc. The students draw in pencil from a photograph, or they can make up their own house. They outline with a sharpie and then paint the sky black. These are always a big hit around Halloween.

Scarecrow Model

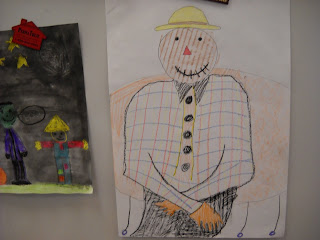
Fifth grade students help me make a scarecrow from recycled clothing etc. and then he models for us. Since we put him in different poses and he will sit still the entire period, he makes a great model. I use this lesson to identify and use visual texture. Students place textured items like burlap, cardboard, and corduroy under their drawing as they color in, creating a textured look to his clothing. The drawings always look great and the younger students enjoy seeing our scarecrow sitting around the Art Room for the month of October.


Tuesday, October 26, 2010

Fall trees

The children love this lesson. We discuss trees and how to draw them. Then discuss the background. Students draw a tree and fill in the entire background, no empty white space. We then use ONE finger to create all our leaves for the tree by painting fall colors with our fingerprints. We talk about the brown leaves ending up on the ground. It doesn't take much in the way of supplies but the results are always good. Hard to believe these two were made by first graders.
 

Wednesday, October 20, 2010

Funny Faces


I do this with my kindergarten classes. They tear pieces of scrap paper to make a face. Then they use old medicine bottles, cardboard, etc. dipped in black paint to add details to their funny face.

Fall Symmetry


Students receive one sheet of 9x12 paper and a half sheet of a different color. Students draw half of their image on the half sheet of paper. After cutting out their image and saving all of the pieces, they glue it to the full sheet of paper.

Leaf Sun Catcher


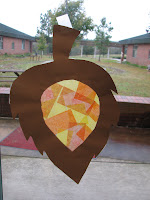
Students trace a template of a leaf two times on brown paper. Both leaves are cut out. A square of wax paper is glued to one leaf and then the student takes pieces of fall colored tissue paper and glues them to the wax paper. A second square of wax paper is put on top. The students then line up the second leaf and glue it to the other leaf. (I tell my students it is kind of like making a sandwich where the leaves are the bread, the wax paper is the mayo, and the tissue paper is the ham)

Explorer Ship


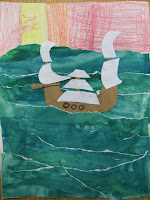
When my third graders are studying explorers, we make a ship. We start by using tempera cakes to paint a 9x12 sheet of paper greens and blues. Then we use crayons or oil pastels to color a second sheet in warm colors. The following week, the blue paper is torn and glued to the warm colored paper to make the ocean. The torn parts are white so if they are glued so the white is at the top, it looks like waves. Lastly, the students draw a ship on brown paper and some sails on white paper. The ship is glued to the ocean scene.

Tuesday, October 19, 2010

Super Artist!


It's a bird.
It's a plane.
It's SUPER ARTIST!

We had a Super Hero Bookfair Night, and all the teachers dressed up as super heroes.


If anyone needs an artist super hero costume... :)

More Fundraiser


Fifth grade used chameleons for their inspiration for the square 1 fundraiser project. We talked about chameleons, read a book about them and then drew one together. They were then urged to give their chameleon a personality of its own. Each one should look different from the rest. We added patterns and bright colors to our designs. They came out GREAT! I loved them,
and so did the kids!


Square 1 Fundraiser

One of the schools where I teach does the Square 1 fundraiser. I thought I would post a few ideas that I used this year with the classes. In third grade we did cats using the art of Laurel Burch. The students enjoyed looking at her work and discussing the cats. We then created cats of our own. I emphasized using lots of patterns in their designs. I thought they came out great! I think you could do the cats with any grade leve and still have success.

Monday, October 18, 2010

Leaf Prints


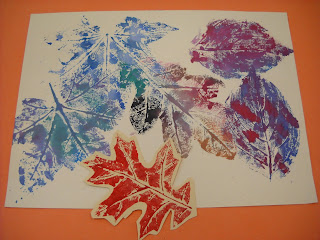
I like to do this leaf printing project in the fall. I ask students to bring in leaves and I bring in some from home. We classify each leaf. With third graders, I talk about mixing the paint right on the leaf to get intermediate colors. I use tempera paint cakes and tell my students to keep the paint on the dry side. Paint the side of the leaf with the veins, turn the painted leaf over onto paper and rub with a paper towel to get a good print. Lift the leaf off.

Friday, October 15, 2010

Fall Leaves


I did this project with 3rd grade. We made leaves with marker outlines and veins, and then used water to make the marker "bleed" (the cheaper the paper the better it works).

Fall Trees


Here are the fall trees I shared at the meeting. I do this with 2nd grade, and it is a 3 day project.

Day 1 - paint the sunset background (we talk about mixing the primary colors)

Day 2 - paint the tree and add highlights and shadows with black and white

Day 3 - Add the leaves using crayons and texture plates


They make the hall look nice and bright!

Thursday, October 14, 2010

Warm and Cool Colors

Warm and Cool Leaves

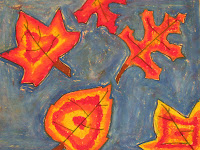
I do this lesson with third graders after reviewing warm and cool colors. They use leaf tracers and outline them with black Sharpie and make veins in their leaves. The leaves in their drawing have to be warm colors and the background has to be cool colors. (this example shows some warm spots in the background but in person it doesn't look that way!) Students use oil pastels for this and the artwork always turns out vivid and stunning!