Showing posts with label winter. Show all posts
Tuesday, January 24, 2012
Friday, December 16, 2011
Painted Cardinals

I found this lesson here:
Supplies:
• 12″ x 18″ white paper
• Blue metallic tempera paint (Michael’s craft store will have this paint)
• Pencil
• Black, red, yellow and white tempera paint
• Q-tips for snow
1.Look at pictures of cardinals. Talk about positive and negative space. (The cardinal and trees are positive, the sky is negative)
2. Explain however, that it’s not necessary to draw the entire body, just the head and neck area.
3. Draw the cardinal's head and neck, then branches behind him.
4. Add blue sparkle paint in the sky (negative), the beak yellow, add brown for the branches, paint the cardinal red, and last paint the black patch around the eye.
Week 2:
1. finish painting.
2. with a thin brush paint black outlines (or you could give the students sharpies)
3. Paint white dots for snow.
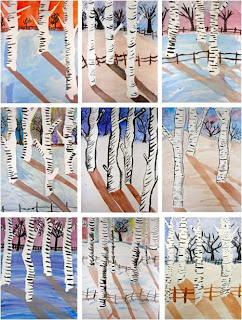
Winter Birch Trees

I found this lesson on Deep Space Sparkle:
We looked at Monet’s painting “Magpie” and talked about the winter landscape.
Supplies: 9″ x 12″ watercolor paper (school grade “Biggie” Brand or Canson), watercolor palette including white (if you don’t have white watercolor/gouache use tempera paint), masking tape or blue painter's tape, salt, small and medium size watercolor brush.
1.Tear strips of masking tape in half lengthwise (not easy) and use ripped or torn edge for the outside of tree. Place the straight edge towards the middle. Do again so there are two torn edges creating the tree. Add branches if you would like. Smooth down with back of fingernail. Make sure ALL trees extend off the top of the paper.
2.Paint a line across the trees near the top. (horizon line)
3.Mingle two or even three colors together to create a winter sky. I like blues, reds, and purples but the children will know what colors they like. It helps to lay down a layer of water so that the colors blend easily. As soon as the color is on, sprinkle salt onto the paper (right).
4.Painting snow can be a bit tricky. I suggested that the students mix a bit of white paint with a touch of brown and paint over some areas of the painting. You could also choose blue but brown makes a better contrast to what is almost always a blue sky. explain shadows.
5. On the white board, next to my sample painting, I drew a sun in the top right corner of where my painting hung. From there, I could draw an imaginary line to demonstrate where shadows would fall. Paint all the way off the paper.
6. Using a small brush and black paint, draw trees along the horizon line. Paint right over the masking tape.
7.The quickest and easiest part of the lesson: bark. Peel off masking tape. If it tears, don’t worry. Just glue wayward piece down (glue stick,not white glue). Using a small brush and the black watercolor paint, paint small curved lines across the tree. Add a fence along the horizon line and in the foreground too.
Labels:
birch trees,
color,
monet,
Trees,
watercolors,
winter
Friday, December 9, 2011
Klimt Winter Trees
I got this idea from another blog (artolazzi - an awesome one if you haven't checked it out), here's the link to the original lesson http://artolazzi.blogspot.com/2009/11/klimt-winter-trees.html
These trees turned out awesome! It took us 3 sessions to make, but didn't take the whole time of each session (we were working on finishing our last project). The kids really loved making these and it was a great way to introdce Klimt! Day 1 we painted the background, day 2 we painted swirly trees and learned about Klimt, and Day 3 we did the decorating (snow, metallic paint designs, sequins and rhinestones). A great wintery lesson!
Friday, January 14, 2011
Snowman
Oil Pastel Snowman
My fourth grade students started out by drawing a one inch border around their paper. Their next step was to use a pencil to draw their snowman close-up. After drawing the snowman, they traced their pencil lines with white glue and let their paper dry until the following week. Once the glue is dry, the students used oil pastels to color in their artwork. The dried glue leaves nice black lines around their shapes in the drawing.
Winter Scenes
Snowflakes


Fancy Snowflakes
I decided to take a little twist on the white snowflake, so we used purple or black paper for our snowflakes to really make them stand out. The students started by using tempera cake paint in blues, whites and purples for the background. While that was drying, they traced lids of different sizes on purple or black paper for their snowflakes. After cutting their snowflakes, they used a silver Sharpie to decorate the flakes. Finally, they glued the snowflakes to their painted background and added some Sharpie work to the background.
Thursday, January 13, 2011
Winter Trees

Winter Tree
I took Caitlin Kell's idea for the sky. In fact, these were going to be the fall trees she had on the blog but time got away. My second graders painted the background using the primary colors. The next week, they cut white paper for the bottom and then used brown paint for the tree. The last week, white paint was added to the branches and they hole punched white paper for the flakes.
Friday, January 7, 2011
Snowflakes
This is a quick, fun and easy project I found on another blog. The kids loved doing them and it was easily finished in one day. I would think it would work for 2nd through 4th grade. I used construction paper crayons for the drawn flakes, but oil pastels would work also.
Labels:
cutting,
Fourth Grade,
motor skills,
Second Grade,
snowflakes,
Third Grade,
winter
Monday, December 20, 2010
Winter Cardinal

I found this from another art blog:
1.Make cardboard wing templates for students to trace to keep the scale of the bird from starting out too small. The rest of the drawing was done with step-by-step instructions on the board. Describe the wing as needing to be tilted a bit, a “shark fin” was added on top, and a belly below. The black face looks a bit like half of a butterfly, and the beak extends directly to the right of it. A tail is added below, along with feet. The branch is behind the feet so it’s lines jump over the feet and tail.
2. After the drawing is done, it needs to be traced with a thin black marker.
3. Lastly, all except the snow is colored in with oil pastels.
Labels:
drawing,
oil pastel,
Second Grade,
Third Grade,
winter
Tuesday, December 7, 2010
Mosaic Penguin
What you'll need:
1 sheet light blue construction paper
Construction paper: black, white, orange, and red
Pen
Glue stick
Black marker
Pattern: http://crafts.kaboose.com/mosaic_penguin_template.pdf
How to make it:
Place pattern on top of the light blue construction paper and trace it with a pen. This will create an indent in the blue paper.Add a simple line behind the penguin's body, just a few inches above the penguin's foot. This is the land.
Tear white and black construction paper into strips, and then tear the strips into squares.
Remove pattern. Apply glue with glue stick to small areas of the blue paper, using the indentations as a guide. Start with the "land" area first, pressing white paper scraps in place.
Still working in small areas (so that your glue doesn't dry before you get to it) press on all the black paper areas. Finish with the white area in the center of the penguin.
Tear or cut out a triangle beak from the orange paper and glue on to the face. Use black marker to add two eyes and eyebrows. Tear or cut out a bow tie from red paper and glue in place under the beak.
1 sheet light blue construction paper
Construction paper: black, white, orange, and red
Pen
Glue stick
Black marker
Pattern: http://crafts.kaboose.com/mosaic_penguin_template.pdf
How to make it:
Place pattern on top of the light blue construction paper and trace it with a pen. This will create an indent in the blue paper.Add a simple line behind the penguin's body, just a few inches above the penguin's foot. This is the land.
Tear white and black construction paper into strips, and then tear the strips into squares.
Remove pattern. Apply glue with glue stick to small areas of the blue paper, using the indentations as a guide. Start with the "land" area first, pressing white paper scraps in place.
Still working in small areas (so that your glue doesn't dry before you get to it) press on all the black paper areas. Finish with the white area in the center of the penguin.
Tear or cut out a triangle beak from the orange paper and glue on to the face. Use black marker to add two eyes and eyebrows. Tear or cut out a bow tie from red paper and glue in place under the beak.
Labels:
First Grade,
Kindergarten,
mosaic,
Second Grade,
winter
Subscribe to:
Posts (Atom)


