Showing posts with label Kindergarten. Show all posts
Tuesday, January 24, 2012
Tuesday, November 8, 2011
Quick Clay Owls
Quick Clay Owls
This could be done with K 1 or 2 after reading Owl Moon or a similar owl book.
This is from the blog 4 Crazy Kings:
Start with a ball (any clay will work)
Smoosh to make circle
Use marker cap to make UUUUUU's on belly
Fold sides in
Fold top down - pinch ears a bit
Use marker cap to make eyes
Use butter knife or similar to make beak -
Finally you can play with a bit by smooshing sides a bit to make owl more round.
Fire and glaze. (You could also use oil pastels/crayon and ink instead of glaze.(See OZ KIDZ ARTZ)
Labels:
clay,
First Grade,
Kindergarten,
owls,
Second Grade
Tuesday, May 3, 2011
Goldfish Matisse style

Goldfish a la Matisse
I came across this lesson in an old Arts and Activities magazine. I decided to try it with my kindergarten students. The results were great!
Day One: Use at least three different colored crayons to rub the paper more than halfway down. At the bottom of the page, glue squares of colored tissue paper. Cut a table from a piece of black paper and glue it on. (I had previously drawn the table line for them so all they had to do was cut)
Day Two: Use a tracer to make the fish bowl. Use blue and green markers to color the water in the fishbowl and then paint with water over the marker. While the bowl is drying, cut out goldfish and leaves. Glue the bowl, fish and leaves to the background.
Friday, February 25, 2011
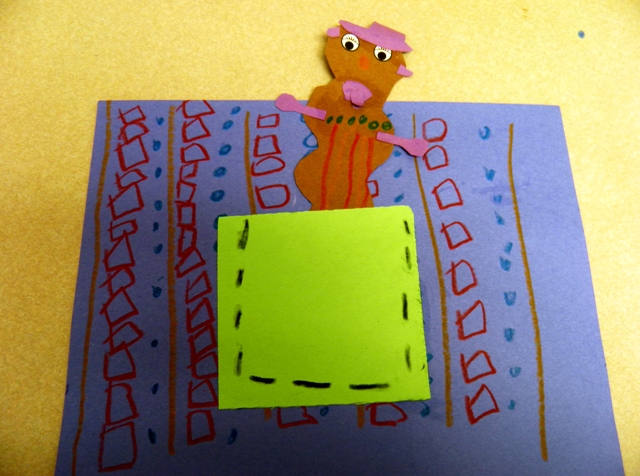
There's a Wocket in my Pocket...
Elementary schools celebrate the birthday of Dr. Seuss. This is a project that I do with kindergarten. I read the book "There's a Wocket in my Pocket". After reading the book, the children start by making a pattern on a piece of paper. We then glue a square on the paper to make a pocket. A few dashes with the crayon and you have stitches around the pocket. The children then make a "Wocket" for in the pocket. We were able to do this in one class period. These examples were completed earlier today. Fun project!
Friday, January 14, 2011
Winter Scenes
Tuesday, December 7, 2010
Mosaic Penguin
What you'll need:
1 sheet light blue construction paper
Construction paper: black, white, orange, and red
Pen
Glue stick
Black marker
Pattern: http://crafts.kaboose.com/mosaic_penguin_template.pdf
How to make it:
Place pattern on top of the light blue construction paper and trace it with a pen. This will create an indent in the blue paper.Add a simple line behind the penguin's body, just a few inches above the penguin's foot. This is the land.
Tear white and black construction paper into strips, and then tear the strips into squares.
Remove pattern. Apply glue with glue stick to small areas of the blue paper, using the indentations as a guide. Start with the "land" area first, pressing white paper scraps in place.
Still working in small areas (so that your glue doesn't dry before you get to it) press on all the black paper areas. Finish with the white area in the center of the penguin.
Tear or cut out a triangle beak from the orange paper and glue on to the face. Use black marker to add two eyes and eyebrows. Tear or cut out a bow tie from red paper and glue in place under the beak.
1 sheet light blue construction paper
Construction paper: black, white, orange, and red
Pen
Glue stick
Black marker
Pattern: http://crafts.kaboose.com/mosaic_penguin_template.pdf
How to make it:
Place pattern on top of the light blue construction paper and trace it with a pen. This will create an indent in the blue paper.Add a simple line behind the penguin's body, just a few inches above the penguin's foot. This is the land.
Tear white and black construction paper into strips, and then tear the strips into squares.
Remove pattern. Apply glue with glue stick to small areas of the blue paper, using the indentations as a guide. Start with the "land" area first, pressing white paper scraps in place.
Still working in small areas (so that your glue doesn't dry before you get to it) press on all the black paper areas. Finish with the white area in the center of the penguin.
Tear or cut out a triangle beak from the orange paper and glue on to the face. Use black marker to add two eyes and eyebrows. Tear or cut out a bow tie from red paper and glue in place under the beak.
Labels:
First Grade,
Kindergarten,
mosaic,
Second Grade,
winter
Wednesday, October 20, 2010
Funny Faces
Thursday, October 14, 2010
Origami Owls

Origami Owls
We have talked so much about origami owls, I decided to give it a try with kindergarten. We folded the owls together (some of course turned out better than others) The students then folded the corners for ears and slit the bottom for feathers. Eyes and a beak were cut from scraps. We discussed and read Good-Night Owl. A tree was ripped from gray paper, a moon was cut, stars were drawn and voila!
Friday, October 8, 2010
Fall Pumpkins
I did this activity with kindergarten. I prepared some brown paper strips so the students could make a fence out of them. I showed the students how to cut the corners off of a rectangle shape to make a circular or oval shape for their pumpkins. They glued their pumpkins to their paper and decorated their papers with construction paper crayons. We finished up with a bit of glitter in the sky.Thursday, September 16, 2010
Shape City
Line Drawings
This is another lesson I did with kindergarten after we talked about line and drew some different kinds of lines on the Smartboard. I had precut strips (lines) of different sizes and colors. They each got a black marker and drew some line patterns on the strips. The strips were then glued to the black paper.
Kindergarten Art


Initial Texture Designs
I have a bunch of plastic textured pages. The students put these under their papers and used large crayons to make colorful texture rubbings. While they were working, I went around and used a black Sharpie to write the first letter of their name. After the students finished with their rubbing, they took a magazine and tore long strips to paste over their letter. They all turned out cute and the kids really thought they had something!
Monday, June 28, 2010
Monday, June 21, 2010
Subscribe to:
Posts (Atom)