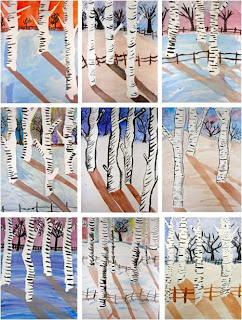
I found this lesson on Deep Space Sparkle:
We looked at Monet’s painting “Magpie” and talked about the winter landscape.
Supplies: 9″ x 12″ watercolor paper (school grade “Biggie” Brand or Canson), watercolor palette including white (if you don’t have white watercolor/gouache use tempera paint), masking tape or blue painter's tape, salt, small and medium size watercolor brush.
1.Tear strips of masking tape in half lengthwise (not easy) and use ripped or torn edge for the outside of tree. Place the straight edge towards the middle. Do again so there are two torn edges creating the tree. Add branches if you would like. Smooth down with back of fingernail. Make sure ALL trees extend off the top of the paper.
2.Paint a line across the trees near the top. (horizon line)
3.Mingle two or even three colors together to create a winter sky. I like blues, reds, and purples but the children will know what colors they like. It helps to lay down a layer of water so that the colors blend easily. As soon as the color is on, sprinkle salt onto the paper (right).
4.Painting snow can be a bit tricky. I suggested that the students mix a bit of white paint with a touch of brown and paint over some areas of the painting. You could also choose blue but brown makes a better contrast to what is almost always a blue sky. explain shadows.
5. On the white board, next to my sample painting, I drew a sun in the top right corner of where my painting hung. From there, I could draw an imaginary line to demonstrate where shadows would fall. Paint all the way off the paper.
6. Using a small brush and black paint, draw trees along the horizon line. Paint right over the masking tape.
7.The quickest and easiest part of the lesson: bark. Peel off masking tape. If it tears, don’t worry. Just glue wayward piece down (glue stick,not white glue). Using a small brush and the black watercolor paint, paint small curved lines across the tree. Add a fence along the horizon line and in the foreground too.


