Friday, December 16, 2011
Painted Cardinals
I found this lesson here:
Supplies:
• 12″ x 18″ white paper
• Blue metallic tempera paint (Michael’s craft store will have this paint)
• Pencil
• Black, red, yellow and white tempera paint
• Q-tips for snow
1.Look at pictures of cardinals. Talk about positive and negative space. (The cardinal and trees are positive, the sky is negative)
2. Explain however, that it’s not necessary to draw the entire body, just the head and neck area.
3. Draw the cardinal's head and neck, then branches behind him.
4. Add blue sparkle paint in the sky (negative), the beak yellow, add brown for the branches, paint the cardinal red, and last paint the black patch around the eye.
Week 2:
1. finish painting.
2. with a thin brush paint black outlines (or you could give the students sharpies)
3. Paint white dots for snow.
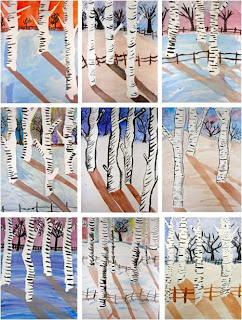
Winter Birch Trees
I found this lesson on Deep Space Sparkle:
We looked at Monet’s painting “Magpie” and talked about the winter landscape.
Supplies: 9″ x 12″ watercolor paper (school grade “Biggie” Brand or Canson), watercolor palette including white (if you don’t have white watercolor/gouache use tempera paint), masking tape or blue painter's tape, salt, small and medium size watercolor brush.
1.Tear strips of masking tape in half lengthwise (not easy) and use ripped or torn edge for the outside of tree. Place the straight edge towards the middle. Do again so there are two torn edges creating the tree. Add branches if you would like. Smooth down with back of fingernail. Make sure ALL trees extend off the top of the paper.
2.Paint a line across the trees near the top. (horizon line)
3.Mingle two or even three colors together to create a winter sky. I like blues, reds, and purples but the children will know what colors they like. It helps to lay down a layer of water so that the colors blend easily. As soon as the color is on, sprinkle salt onto the paper (right).
4.Painting snow can be a bit tricky. I suggested that the students mix a bit of white paint with a touch of brown and paint over some areas of the painting. You could also choose blue but brown makes a better contrast to what is almost always a blue sky. explain shadows.
5. On the white board, next to my sample painting, I drew a sun in the top right corner of where my painting hung. From there, I could draw an imaginary line to demonstrate where shadows would fall. Paint all the way off the paper.
6. Using a small brush and black paint, draw trees along the horizon line. Paint right over the masking tape.
7.The quickest and easiest part of the lesson: bark. Peel off masking tape. If it tears, don’t worry. Just glue wayward piece down (glue stick,not white glue). Using a small brush and the black watercolor paint, paint small curved lines across the tree. Add a fence along the horizon line and in the foreground too.
Labels:
birch trees,
color,
monet,
Trees,
watercolors,
winter
Tissue Paper Leaves
Supplies:
6″ x 9″ white drawing paper
Tissue paper cut into 5″ x 5″ squares
Mixture of white glue and water
small paint brush
Black marker (waterproof is best)
Oil Pastel
1. Tracing or drawing the Leaves with sharpie. Have pictures of leaves. They can put the tissue paper on top of the leaf drawings or draw leaves on their own. They must have newspaper under the tissue paper at all times.
2.Cut out leaves and arrange the leaves on the paper and brush smooth with the glue mixture under and on top. (Mod Podge would work too.)
3. Pick your next leaf and do it again! Encourage overlapping!
4. Week 2: The students will finish gluing leaves, and draw oil pastel leaves.
5. The students will then add a frame. (If there is time they can add tissue paper scraps to decorate the frame.)
Friday, December 9, 2011
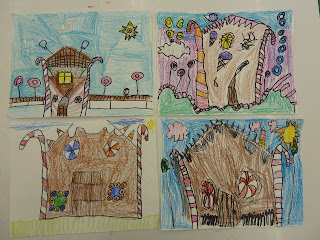
Candy House
I've made these candy houses for several years with 1st grade (man do they like talking about candy). This year I tied in a literacy aspect and read "Hansel and Gretel" by James Marshall. To start out the house they make two candy canes for the sides (upside down "J"s), connect the bottoms of the candy canes, and make a pointed roof. After that the decoration is up to them. The houses that look the best usually have the most details. A fun lesson for right before winter vacation.
Klimt Winter Trees
I got this idea from another blog (artolazzi - an awesome one if you haven't checked it out), here's the link to the original lesson http://artolazzi.blogspot.com/2009/11/klimt-winter-trees.html
These trees turned out awesome! It took us 3 sessions to make, but didn't take the whole time of each session (we were working on finishing our last project). The kids really loved making these and it was a great way to introdce Klimt! Day 1 we painted the background, day 2 we painted swirly trees and learned about Klimt, and Day 3 we did the decorating (snow, metallic paint designs, sequins and rhinestones). A great wintery lesson!
Monday, December 5, 2011
Horse of another Color
This is based on several books.."Everything but the Horse", by Holly Hobbie, "Hush, Little Horse", by Jane Yolen, and a really old story, "Horse of a Different Color"...which I cannot now find.
The students will make a jointed horse shape by tracing pieces of the horse onto the desired color of paper and coloring the pieces with either patterns or realistic shadings, depending on which book you are illustrating. The sections are cut out, put together with brads, and a yarn tail is added to finish it off. The students love them, and move them around the table in a varity of positions.
I did this with first graders, but it can be used whereever...the older students do better with the more realistic horses. I used construction paper and markers for most of the horses, but you may wish to use oil pastels.
Enjoy!
Subscribe to:
Posts (Atom)