Friday, December 16, 2011

Painted Cardinals


I found this lesson here:

Supplies:
• 12″ x 18″ white paper
• Blue metallic tempera paint (Michael’s craft store will have this paint)
• Pencil
• Black, red, yellow and white tempera paint
• Q-tips for snow


1.Look at pictures of cardinals. Talk about positive and negative space. (The cardinal and trees are positive, the sky is negative)
2. Explain however, that it’s not necessary to draw the entire body, just the head and neck area.
3. Draw the cardinal's head and neck, then branches behind him.
4. Add blue sparkle paint in the sky (negative), the beak yellow, add brown for the branches, paint the cardinal red, and last paint the black patch around the eye.

Week 2:
1. finish painting.
2. with a thin brush paint black outlines (or you could give the students sharpies)
3. Paint white dots for snow.

Winter Birch Trees


I found this lesson on Deep Space Sparkle:

We looked at Monet’s painting “Magpie” and talked about the winter landscape.

Supplies: 9″ x 12″ watercolor paper (school grade “Biggie” Brand or Canson), watercolor palette including white (if you don’t have white watercolor/gouache use tempera paint), masking tape or blue painter's tape, salt, small and medium size watercolor brush.

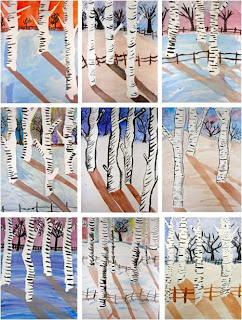
1.Tear strips of masking tape in half lengthwise (not easy) and use ripped or torn edge for the outside of tree. Place the straight edge towards the middle. Do again so there are two torn edges creating the tree. Add branches if you would like. Smooth down with back of fingernail. Make sure ALL trees extend off the top of the paper.
2.Paint a line across the trees near the top. (horizon line)
3.Mingle two or even three colors together to create a winter sky. I like blues, reds, and purples but the children will know what colors they like. It helps to lay down a layer of water so that the colors blend easily. As soon as the color is on, sprinkle salt onto the paper (right).
4.Painting snow can be a bit tricky. I suggested that the students mix a bit of white paint with a touch of brown and paint over some areas of the painting. You could also choose blue but brown makes a better contrast to what is almost always a blue sky. explain shadows.
5. On the white board, next to my sample painting, I drew a sun in the top right corner of where my painting hung. From there, I could draw an imaginary line to demonstrate where shadows would fall. Paint all the way off the paper.
6. Using a small brush and black paint, draw trees along the horizon line. Paint right over the masking tape.
7.The quickest and easiest part of the lesson: bark. Peel off masking tape. If it tears, don’t worry. Just glue wayward piece down (glue stick,not white glue). Using a small brush and the black watercolor paint, paint small curved lines across the tree. Add a fence along the horizon line and in the foreground too.

Tissue Paper Leaves


Supplies:
6″ x 9″ white drawing paper
Tissue paper cut into 5″ x 5″ squares
Mixture of white glue and water
small paint brush
Black marker (waterproof is best)
Oil Pastel

1. Tracing or drawing the Leaves with sharpie. Have pictures of leaves. They can put the tissue paper on top of the leaf drawings or draw leaves on their own. They must have newspaper under the tissue paper at all times.

2.Cut out leaves and arrange the leaves on the paper and brush smooth with the glue mixture under and on top. (Mod Podge would work too.)

3. Pick your next leaf and do it again! Encourage overlapping!

4. Week 2: The students will finish gluing leaves, and draw oil pastel leaves.

5. The students will then add a frame. (If there is time they can add tissue paper scraps to decorate the frame.)

Friday, December 9, 2011

Candy House


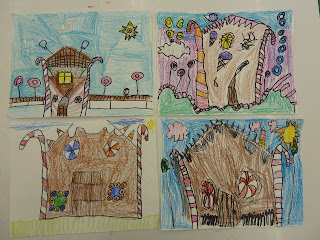
I've made these candy houses for several years with 1st grade (man do they like talking about candy). This year I tied in a literacy aspect and read "Hansel and Gretel" by James Marshall. To start out the house they make two candy canes for the sides (upside down "J"s), connect the bottoms of the candy canes, and make a pointed roof. After that the decoration is up to them. The houses that look the best usually have the most details. A fun lesson for right before winter vacation.

Klimt Winter Trees


I got this idea from another blog (artolazzi - an awesome one if you haven't checked it out), here's the link to the original lesson http://artolazzi.blogspot.com/2009/11/klimt-winter-trees.html


These trees turned out awesome! It took us 3 sessions to make, but didn't take the whole time of each session (we were working on finishing our last project). The kids really loved making these and it was a great way to introdce Klimt! Day 1 we painted the background, day 2 we painted swirly trees and learned about Klimt, and Day 3 we did the decorating (snow, metallic paint designs, sequins and rhinestones). A great wintery lesson!

Monday, December 5, 2011

Horse of another Color

This is based on several books.."Everything but the Horse", by Holly Hobbie, "Hush, Little Horse", by Jane Yolen, and a really old story, "Horse of a Different Color"...which I cannot now find.
The students will make a jointed horse shape by tracing pieces of the horse onto the desired color of paper and coloring the pieces with either patterns or realistic shadings, depending on which book you are illustrating. The sections are cut out, put together with brads, and a yarn tail is added to finish it off. The students love them, and move them around the table in a varity of positions.
I did this with first graders, but it can be used whereever...the older students do better with the more realistic horses. I used construction paper and markers for most of the horses, but you may wish to use oil pastels.

Enjoy!

Monday, November 28, 2011

Fall Trees


This is a project that I used to do every year. I found my sample and decided to do them this year. I was so happy I made that decision, they came out beautiful. I did them with fourth grade. We made the tissue paper collage background one week, and then added the tree with oil pastels the next. We were able to review our shading to make things look three dimensional.

Wednesday, November 9, 2011

Birds of a Feather

This is an excellent lesson for those who wish to cover the Art SOL's  and  the schools' language arts requirements. Second grade students will fill an entire 12''x 18'' paper with a varity of lines;zig-zag,curved, slanted, broken,wavy, dotted...any kind of line imagined. Any left over space may be filled in with dots and dashes. This will take one class period. Next class, students will draw ON THE BACK OF THE PAPER a large figure "8" --from top to bottom--this will be the body of the bird. ( .....make the neck of the bird a little thicker than it is.) On the rest of the paper, use feather patterns---made ahead of time ---to trace 14/15 feathers. Glue the body of the bird to the middle of a constrasting color 12''x18'' paper. You --the teacher--draw the top line of the wings while the class cuts out the feathers. The class puts glue onto each ''wing'', and glues the feathers down. Add tail feathers, google eyes, feet, and a paper beak.   Instant bird!
This lesson may be used with a varity of books,...just check out your library.

Tuesday, November 8, 2011

Quick Clay Owls


Quick Clay Owls
This could be done with K 1 or 2 after reading Owl Moon or a similar owl book.

This is from the blog 4 Crazy Kings:


Start with a ball (any clay will work)

Smoosh to make circle

Use marker cap to make UUUUUU's on belly

Fold sides in

Fold top down - pinch ears a bit

Use marker cap to make eyes

Use butter knife or similar to make beak -
Finally you can play with a bit by smooshing sides a bit to make owl more round.

Fire and glaze. (You could also use oil pastels/crayon and ink instead of glaze.(See OZ KIDZ ARTZ)

Thursday, October 20, 2011

Birds

This lesson is based on the book "" Birds"", by Kevin Henkes. The lesson may be found in Deep Space Sparkle Lesson Plans/Art & Literature II, which in turn may be viewed online. Janis Gillespie payed-yes, it costs money-and downloaded the unit. We reviwed the lesson and then selected  a section which we thought would be useable at lower elementary.
We started by drawing a branch with leaves on a light blue paper.  We outlined with black oil pastels, and painted in with tempra...... this would take one class period. Next we used scrap paper to draw 3 birds, and colored these with more oil pastels. You may spend additional time on a "how-to-draw-birds'', or you may just have the students wing it. When the birds are complete, cut out and glue onto the blue paper, carefully placing them on the branches. We did not add insects/clouds/sky, but feel free to improvise. This lesson would do well in the spring.!

Wednesday, October 12, 2011

Cubist Hands

This is a neat lesson to do with your upper elementary students that covers shades and tints, color mixing, and Art Appreciation. Students trace their hand 2 times onto a 12'' square piece of gray bogus paper, once from the bottom, and once from a side. Using a ruler, trace 3 lines from the top to the bottom, and 3 times side to side. Don't forget to slant the lines a little. Now-very important- outline everything with a black sharpie. Begin painting. EVERYTIME YOU HIT A LINE, CHANGE  COLORS. You may place the same colors kater/corner. When all the painting is complete, let dry completely, re-outline with sharpies, and  make the lines dark and even. They are very colorful, and you may wish to limit the paintings to certain colors of your choice.

Monday, October 10, 2011

Fall Still Life


I did this lesson with second graders. They created their piece by looking at a still life of a pumpkin and 3 gourds. There was a different arrangement of pumpkins and gourds on each table. We painted paste papers (1 orange, 1/2 green and 1/2 yellow) in one class while they were finishing up another project, then used them to cut out the shapes for our still life. They then added all the details of the pumpkins and gourds with crayons. If they had time they could color the background. They all came out really different and the paste paper added a nice texture. The kids loved painting them and combing through a design!

Friday, October 7, 2011

Face Book Books

This is an entertaining lesson, which may be used with the older elementary classes. Students will need an old paperback- (the thicker the better)-paste, and a short wooden dowel. I have a lot of short pieces of dowels  around as I do wall hangings with the fifth grades in the spring, but you can buy them at Lowe's if needed. First, students will tear off the back and front cover.  Decide on what shape the outside edge of the pages will take, and cut a pattern. Trace the pattern on a page, then bunch 5-8 pagrs together and cut. In my sample I used a profile of a face, but you can use any shape; apple, house, animal...any shape that is not too complex. When all pages are cut, load the dowel and the first and last page with paste. Put the dowel in the middle, press the first and last pages together, and let dry. The''book'' will stand up by it's self when dry. You can buy expensive YES! paste, if you wish, as that is what was used in the Bookmaking class.

Tuesday, September 27, 2011

City Reflections


This is a project I found on another art blog. http://laughpaintcreate.blogspot.com/2011/08/city-prints.html This was a fourth grade project that reviewed warm and cool colors. It was also fun for the children to print. We painted the background the first week and then started work on our printing plate (foam). The next week we finished our drawing of the city and printed.  They really came out nice and the children had a great time doing them.

Big Fat Hen


I read the book "Big Fat Hen" to the first grade. We discussed all the beautiful illustrations of hens in the book and then drew one step by step. After talking about  texture, we used texture rubbing plates when adding the color to the hens.

Monday, September 26, 2011

Illustrated Names


I use this lesson during the frst few weeks of school since it helps me to remember my students' names and get to know them. During the first class they decorate each letter of their name to tell something about themselves (the A is a piece of pizza, the d includes a soccer ball etc.). The second class involves a lesson on positive and negative space and opposite colors. Students make a cut paper design using these principles. When complete, they glue their name to the top of the cut paper design.

Thursday, September 22, 2011

Uncle Sam


Uncle Sam
I had a bunch of cardboard egg cartons donated. I did this with fourth grade for a patriotic project. It is a little crafty but they turn out very cute and the students and other teachers love them!
Materials:
(4) cups from egg carton
blue and skin color tempera paint
(1) 2"x4" white construction paper
(1) l"x5" blue construction paper
(1) 2"x2" blue construction paper
(1) 3"x3" black construction paper
scraps of white yarn, paper, ribbon
scissors and glue
sharpies
Day 1
1. We talk about symbols and that Uncle Sam symbolizes the United States.
2. Each student is given 4 cardboard cups from an egg carton. Trim the edges.
3. They must glue together the egg cartons and paint the top skin color and the bottom blue. (this can be a challenge for them so it may take a whole day to just do this)
4. Have them write the name on the bottom of one egg cup with sharpie.
5. Collect in a paper box lid.
Day 2
1. Fold the 3"x3" black construction paper in half and cut a heart for the feet. Glue to the body.
2. Use the l"x5" blue construction paper strip for the arms, adding hands (cut
into blue rectangle). Glue the center of the strip to the back of the body. Write the name on the back of the blue rectangle in sharpie
3. Color or paste red strips on the 2"x4" white paper. Paste and roll into a cylinder.
4. Cut evenly spaced slits up one edge, fold back and paste to the brim, brim, fold the 2"x2" blue construction paper in half and trim off corners.
5. Use the scraps of white yarn to make hair and a beard. Glue to the head. Glueon the hat. Add other decorations with the scraps.

Sunset Silhouettes


These are great for fall. I found this on Deep Space Sparkle. I shopw 4th or 5th grade this video on positive and negative space: Positive and Negative Space.


  1. We talk about what creates a silhouette.

  2. Students wash a 9x12 inch piece of drawing paper.

  3. Then they trace a ruler on all 4 side of the black paper to create a frame.

  4. After that, they draw a landscape with pumpkins, bare trees, fences, grass, houses, etc.

  5. Next they cut out the negative space (or background).

  6. Finally they glue the black on top of the sunset colors.

Pop-Up Books

I took a graduate class last fall in bookmaking....NOT SCRAPBOOKING.  While we did several versions of binding and construction, not all were applicable to elementary Art....several, however were. This is a simple pop-up that may be used 3-5 grades, providing you work slowly.
To start, you need 2 bookends, about 6''x4'', of some heavy poster board. Next cut a long strip of heavy paper for the folded pages. Pleat it accordian style to fit inside the ends. The paper should be slightly smaller than the bookends. On each outward fold , cut a small design that will ''pop''.
The inside paper that is to be folded needs to be long enough to make at least 4-5 cutouts, so you will need 8-10 pages, plus 2 more pages to glue to the bookends.
For the bookmaking class, we used special glue, but a cheaper substitute is paste...yes, the stuff none of us buy anymore.
 I and Janis Gillespie spent 2 hours wednesday, September 21 constructing one. They turned out great!

Name Design

This lesson uses letters of the student's name to form a colorful, patterened design. You may also use vocabulary words, spelling words, or any other words which you wish the students to remember.
Start by drawing on a 12'' x 18'' white paper the word/name you wish.....you may change either size or paper color. Place on each table ONE color...have the class paint in the first letter. Change colors, clean brushers. Place the next color on the table--next color, next letter. Repeat until all letters are done. Then begin with the spaces, and repeat the process until all spaces are done. Time permitting, pattern in the letters or background. These always turn out great...the biggest problem is getting the class to paint slowly, so that they stay within the lines. P.S. I use regular tempra.

Tuesday, September 13, 2011

Positive and Negative Space Name Art


Positive and Negative Space Name Art


This turned out to be a nice review of positive and negative space for my fifth graders. They began by making a grid on their papers using a ruler with different sized squares and rectangles (one space for each letter or number). Then the students drew the letters of their names using capital and lowercase letters that had to touch at least two sides of the spaces on the grid. If they wanted, they could also put the year or the year they were born. Finally, students colored in either the letter or the space around the letter with a marker and then erased all pencil lines left showing. The fifth graders were very proud of their abstract names.

What's in a line?


Contour Line Drawings


My second graders were reviewing types of lines. I took out a bunch of scrap paper and they searched for interesting shapes. They used a glue stick to put the shapes on their 9x12 paper. Then they followed the contour of their shapes with a marker.

Friday, August 26, 2011

Harold and the Purple Crayon


This is my favorite lesson for kindergarten's first art class. We read "Harold and the Purple Crayon" and then talk about different adventures we could go on if we had magical purple crayons like Harold. The kids only get purple crayons and they can draw adventures on the front AND back of their paper. When they are finished I also have a movie version of the book that I let them watch while the detailed drawers finish up.

Thursday, August 25, 2011

Room Idea


Room Idea for First Nine Weeks


I decided to go with a "Welcome to the Pack" theme. I also have a book called "The Crayon Box that Talked" to help with going over rules and getting along in the art room.

Sunday, August 7, 2011

Anansi the Spider: A Tale from the Ashanti


This project was based on the African folk hero Anansi the Spider by Gerald McDermott. We tried two different methods of creating the graphic spider. The first type was flat, the other was to glue the paper legs into a circle. Both methods were successful, it would be a matter of preference. This project was very simple to do and the results are very bold and graphic.

Bigfoot Cinderrrrrella


This project is based on the book Bigfoot Cinderrrrrella by Tony Johnston. We used 1 inch wide paper strips and glued them together. We used clothespins to hold them together to dry while we were building. We experimented with both gluing them onto a piece of paper and also just hanging them up from the ceiling with no background paper. Another fun project that was pretty simple to do, if you used clothes pins... aka "art clamps".

Wednesday, August 3, 2011

Cloudy with a Chance of .....


Cloudy with a Chance of Meatballs is a children's book written by  Judi Barrett and illustrated by Ron Barrett. We had a great time making a project based on this book. Our project ended up being Cloudy with a Chance of Snacks.  We used crayons, watercolors, glue and various snack food items.

Professional Development ~ August 2011

A group of us worked together the past two days exploring children's literature and art projects inspired by them. We had a lot of fun and shared a lot of good ideas. I am going to try to get a few of our projects posted  in the next few blogs.

Tuesday, May 3, 2011

Aliens from Planet Symmetry


Symmetry


I knew my third graders were reviewing symmetry and I was tired of the old butterfly. So I decided to have them make aliens. Of course they started by picking a color for their alien, folding the paper, and then drawing a curvy line.


It was neat to see all of the different shapes that were created and the students were very excited to decorate their aliens!


Goldfish Matisse style


Goldfish a la Matisse


I came across this lesson in an old Arts and Activities magazine. I decided to try it with my kindergarten students. The results were great!


Day One: Use at least three different colored crayons to rub the paper more than halfway down. At the bottom of the page, glue squares of colored tissue paper. Cut a table from a piece of black paper and glue it on. (I had previously drawn the table line for them so all they had to do was cut)


Day Two: Use a tracer to make the fish bowl. Use blue and green markers to color the water in the fishbowl and then paint with water over the marker. While the bowl is drying, cut out goldfish and leaves. Glue the bowl, fish and leaves to the background.

Friday, March 25, 2011

Giraffe's Can't Dance...


I've noticed this project on many art blogs. I was always curious, this year I decided to give it a try with my first grade. I loved it! The children loved it! The results were amazing.... so fun. It is crayon resist.

Royal Self Portraits...

This is one of my favorite projects to do with first grade! They love it and the results are adorable!!! We discuss facial features and placement and draw together. They outline their drawing with Sharpie. We then outline with a Crayola marker and then use a wet paint brush to fill in the shape... We call it "Painting with a Marker". The kids love it and talk about how they might be "allowed" to paint this way at home.


The final step is adding "jewels" to our crown.

Thursday, March 24, 2011

Analogous Colors

Analogous Color Weaving

In reviewing analogous colors with my fourth graders, I decided to put a weaving twist with it.

1. review the color wheel
2. draw an organic shape in the middle of your paper
3. follow the contour of your first shape to draw other shapes around your first
4. use a Sharpie marker to trace over pencil lines
5. Paint the shape picture with an analogous color family (watercolor or tempera)

The following week:

1. use a black piece of 9x12 paper to make a loom
2. cut your existing painting into strips (a ruler width is a good size)
3. weave your painting through the black paper. there should be 3-4 strips left.
4. glue your artwork onto a paper from the same color family
5. use the leftover strips from your painting to decorate the edge

Sensational Still-Life


Sensational Still-Life

I find that my older students have trouble drawing things large enough so we cheated a bit with this still-life and used tracers for the fruit and bowl. (For my more confident artists, I gave them a choice to use or not to use the tracers) The project was more about color anyway, so I didn't feel too badly about the tracers. Plus the results are always nice and everyone comes away with a piece of artwork that is successful.


Lions, and Tigers, and Bears...

March comes in like a lion...


In follow-up to jungles in first grade, I have my second graders draw a lion on white 12x18 paper. I demonstrate the steps on drawing the lion and then they are on their own. Their lion has to be divided into shapes so that patterns can be put on the lion. After the pencil drawing is complete, they use a black Sharpie marker to go over their lines. Watercolor or tempera cakes are used to color their lion. The following week, the lions are cut out and glued to black paper. Green cut out leaves and vines are added. Stars and a moon complete the jungle background.